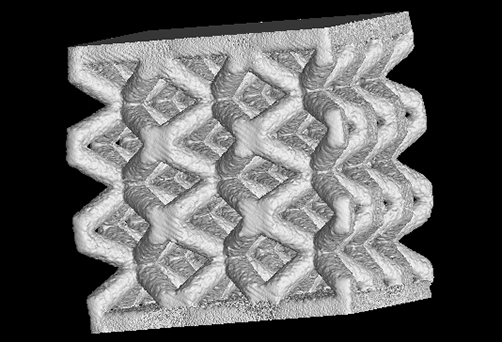
Setting up the loading machine to perform in-situ compression testing of additively manufactured lattice structures (courtesy of Siemens AG) using X-ray micro computed tomography at BAM
Source: BAM
Non-destructive material characterization is central for the understanding of metallic alloys, ceramics and composites. These methods serve as reference methods for the structural integrity of components and materials, i.e. for the qualification and validation of additively manufactured materials, from powder to component.
BAM develops and evaluates non-destructive testing methods for the characterization of internal structures and defects in the micrometer and sub micrometer range. These methods have been tailored by BAM for the study of additively manufactured materials and components. Quantitative 3D material characterization is realized using high-resolution X-ray imaging methods. BAM has decades of experience in the development of X-ray micro Computed Tomography (µCT), the possibilities of which have been extended by means of synchrotron X-ray µCT at the BAMline of the Berlin Electron Synchrotron BESSY II. Depending on the specimen size, this technique enables the visualisation and quantitative defect characterization in the length scale from as low as 0.001 mm. BAM uses CT to study aspects relevant for additive manufacturing such as porosity and particle characteristics in powder feedstock through to defect populations, surface roughness and metrology (distortion) in complex AM structures. A complementary technique developed at BAM is Synchrotron X-ray refraction Tomography (SynRef-CT) which is suitable for the investigation of smaller defects due to the detectability of inhomogeneities (cavities or cracks) below the spatial resolution of µ-CT. The combination of µCT and X-ray refraction techniques has allowed classifying different kinds of defects in AM materials.
BAM has extensive experience with residual stress analysis using laboratory-scale X-ray, synchrotron X ray, and neutron diffraction. They can all apply to real-life components from the surface to within the bulk. These techniques are used by the BAM to study the influence of process parameters, geometry and heat treatments on the residual stress state in additive manufactured alloys. The micromechanical fundamentals of the deformation behaviour of additively manufactured metals are also investigated by BAM via in-situ tests with high-energy X-rays and neutrons.

Gerendertes Volumen der additiv hergestellten Gitterstruktur (mit freundlicher Genehmigung der Siemens AG), das während der Druckprüfung mit Röntgen-Mikro-Computertomografie aufgenommen wurde.
Source: BAM
Other non-destructive techniques are used for quality assessment and microstructural analysis of components. High-resolution ultrasonic testing using immersion technology is a standardized non-invasive method of material characterisation that is suitable for localizing macroscopic inhomogeneities and for investigating mesoscale material distributions. At BAM, immersion technology systems are available for three different component sizes. In comparison to the usual contact technique, a significantly higher resolution is achieved with the immersion technique. Through the complementary use of X-ray techniques and ultrasonic testing, different length scales of features (defects, grains, pores) and sample sizes can be investigated for additively manufactured components.


